![]()
![]()
![]()
A surface entity for ProBasic and ProSurf is defined by a rectangular B-spline or NURB (Non-Uniform, Rational, B-spline) surface. Each surface consist of a rectangular grid of "rows" and "columns" which can be stretched or distorted into various boat and ship hull shapes. These rows and columns are spread over and define the complete surface, but they are generally not stations, waterlines, or buttocks. This is the biggest change that you will have to deal with in going from designing by hand to designing by computer. For a more in-depth discussion of this topic, see the article:
"Hull Design: From the Drawing Board to the Computer" - Stephen M. Hollister
Computers in Small Craft Design, symposium by SBYD, Nov., 1991
(This article is available from New Wave Systems, Inc.)
The advantage of using these NURB surfaces is that you do not have to deal with matching up the waterlines with the buttocks with the stations. With the 3D NURB surfaces, the hull is guaranteed to be completely defined with all three views matching up exactly. If you change the hull surface shape in one view, the change is automatically reflected in all of the other views. You can even dynamically alter the shape of the hull in the 3D view to see this effect in action.
Another difficulty associated with NURB surfaces is their rectangular nature and their four hard corner points. As you stretch a NURB surface into a more non-rectangular shape to fit a particular boat or ship, you will begin to have problems in shaping and fairing the surface. To minimize this effect, the most important rules regarding NURB surfaces are to break a hull into multiple, rectangular regions (one for each NURB surface) and to space the rows and columns evenly over the surface. There is often more than one way to model a boat or ship using NURB surfaces. After a little bit of practice, you will quickly learn the idiosyncrasies of designing a hull with NURB surfaces.
Another thing to keep in mind is that the hull is completely and uniquely defined by NURB surfaces, and each surface is defined by its grid of rows and columns. The number of rows and columns you use for each surface depends on the detailed shape of the hull. When you are designing the hull with these NURB surfaces, do not worry about any station (or frame), waterline, or buttock position. These line locations can be changed at any time and do not affect the shape of the hull (since the surface is defined by the rows and columns). Think of it like a word processor document. You type in the words without regard to the format of the output. After you are done, you can format the document and print it out. With this hull design technique, you design the hull using these NURB rows and columns and then later on decide where you want your stations, waterlines, buttocks, and diagonals. The program can then automatically cut and display a complete lines drawing for the hull. The lines are often referred to as "derived" hull cuts, since they are determined from the NURB surfaces rather than define the surface.
With the traditional hand method, the designer defines the hull by laying out 11 evenly-spaced stations (with extra half stations, if necessary) from the forward end of the waterline to the aft end of the waterline (or some variation of this). All of the waterline and buttock grid lines are then defined and fixed. Everything is drawn using these pre-defined grid lines. With NURB surfaces and their rows and columns, you define the hull without pre-specifying this grid of lines. These lines locations can be selected (and changed) at a later time to automatically produce the lines drawing or to produce a complete table of offsets.
Note: An interesting result of this change in hull definition process is that there is no big distinction between stations and frames. Stations were defined as the locations that the designer used to define the shape of the hull and the frames referred to the locations of the structural components (their shape was defined by the loftsman on the loft floor). With the use of NURB surfaces and their rows and columns, there is no such thing as stations which define the shape of the hull. Any transverse cut of the hull can be derived automatically from the NURB surface, whether it is a station or a frame cut. This has led to a vague usage and distinction between the terms frames and stations. ProBasic and ProSurf tend to use the terms interchangably and in general call them "hullcuts". In practice, you might have two sets of numbers: one for stations to display on the lines drawing, and one for generating the construction frame shapes to send to a CAD or NC (Numerical Control) cutting program. At this time, ProBasic and ProSurf allow you to define only one set of station or frame hullcuts at a time
The following section discusses the process of defining, modifying, and deleting surface entities.
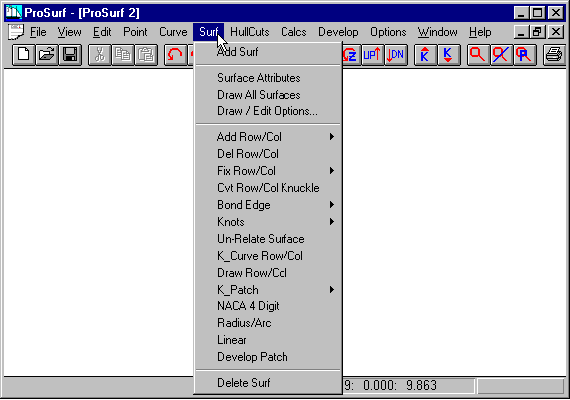
This screen shows the "Surf" set of pull-down menus for creating, modifying, and deleting NURB surface entities. The commands with the small horizontal "carets" indicate that those commands have a list of sub-commands associated with them. This tutorial will cover only the basic set of commands to create and modify surfaces.
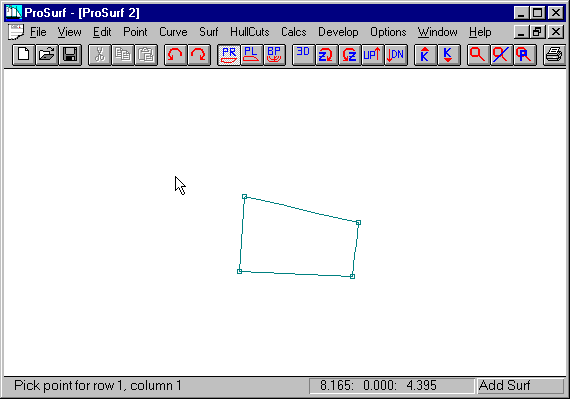
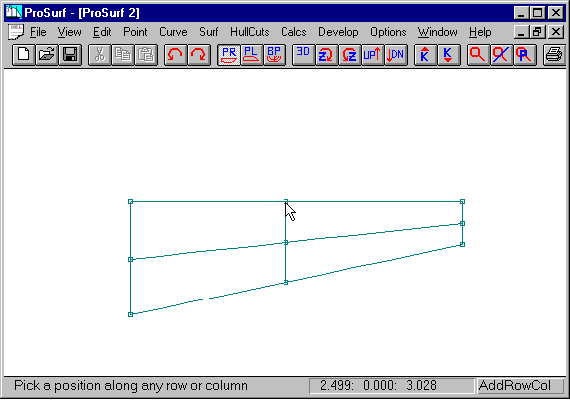
This screen shows the results of creating a new surface with the "Add Surf" command. When you add a new surface, it always starts out as a simple, flat, two row and two column surface defined by its four corner points. This surface was added as follows:
1. Select the "Add Surf" command from the Surf set of pull-down menus. This will become the current command and its label will appear in the lower right corner of the window. The program will also prompt you to: "Pick point for row 1, column 1". (See the status line on the screen above.)
2. The points need to be entered in a back-and-forth fashion, rather than in a circular (clock-wise or counter clock-wise) fashion. For the above surface, the first corner point was defined by positioning the cursor at the lower right corner of the surface and "clicking" the left mouse button. A box appears at that point.
3. The program will then prompt you with: "Pick point for row 1, column 2". You will then position the cursor at the lower left corner of the surface and "click" the left mouse button. A box will appear at that point.
4. The program will then prompt you to enter points for row 2, column 1, and for row 2, column 2. When the fourth (last) corner point has been entered, the program will draw lines connecting all four corners of the surface, which spans the area between the two rows and two columns. That area is now completely defined by a NURB surface.
What is the difference between rows and columns? Nothing. You do not have to be concerned about whether you have the rows going horizontally or vertically on the screen. In fact, you will notice that many of the Surf commands seem to apply to both rows and columns at the same time, such as the "Add Row/Col" command. This means that you do not have to keep track of which lines are the rows and which lines are the columns: the command work for either type of line. The old DOS versions of ProBasic and ProSurf tried to enforce that rows always flow longitudinally along the length of the hull and the columns always flow vertically along the hull. This turned out to be impractical (meaningless) for surfaces which were oriented at an angle to all three coordinate axes. Therefore, in the new Windows versions, there is no distinction made between rows and columns. Internally, in the program, there is a difference between the usage of rows and columns, but all of that is hidden from the user. However, for practical purposes and for discussion sake, we often refer to surface lines which flow horizontally as rows, whether or not they really are rows. Likewise, for columns, we often refer to vertically oriented lines as columns. This usage may not be completely accurate, but it does make it easier to distinguish between the lines when talking over the phone.
The Add Surf command adds a very simple surface to your model. To modify and add to its shape, follow the directions given below.
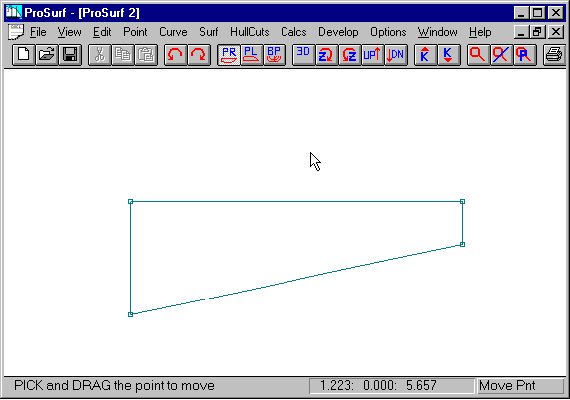
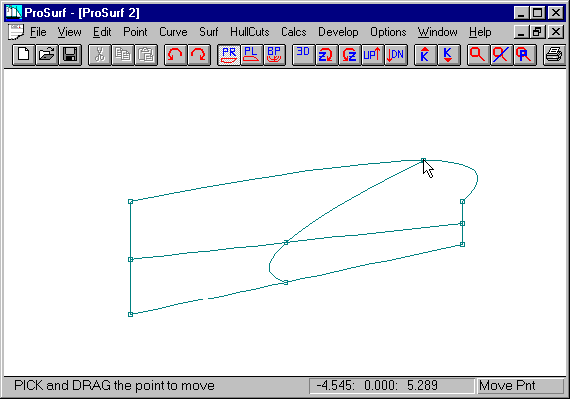
This screen shows the results of moving the four corner points of the simple surface. This is done with the "Move Point" command in the "Edit" set of pull-down menus. Remember that the Move Point command work on any point for any entity type. Note that the surface is completely defined by the intersections of the two rows and two columns. This means that the shape of the surface can only be controlled by repositioning these points (defined by small boxes). The next screen will show you how to add more rows and columns to increase the flexibility and control of the surface.
To move points on the surface, follow these instructions.
1. Select the "Move Point" command in the "Edit" set of pull-down menus. The Move Point command becomes the current command and its label is displayed in the lower right of the window.
2. Position the cursor near the point you wish to move.
3. Press down of the left mouse button to select the point of the surface.
4. Drag (keeping the button held down) the point to the new position and release the button. (This process works the same for any entity type.)
5. Repeat this process for the same or any other point on any entity.
For detailed surface shaping or fairing, see the tutorial on curve and surface fairing.
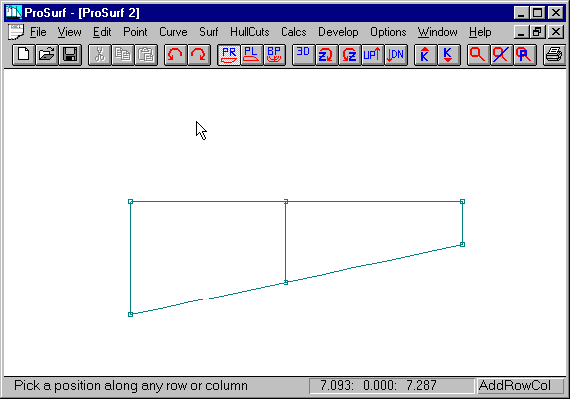
If a surface was limited to only two rows and two columns, its use as a hull modeling tool would be non-existent. The only way to increase the flexibility and shape of a surface is to add additional rows and columns to the surface. This process adds more defining points located at the intersections of the rows and columns. The screen above shows the previous surface with one additional "column" added to it. (Remember that we really don't care which is a row and which is a column. We will generally refer to horizontal lines as rows and vertical lines as columns.) To add a column like this, follow these steps:
1. Select the "Add Row/Col - Add Row/Col Angle" sub-command in the "Surf" set of commands. This command will become the current command and will show its label in the lower right of the screen.
2. Position the cursor somewhere along either of the two horizontal rows approximately where you want the new column to be inserted.
3. "Click" the left mouse button to insert the new column. The program will insert the column at the point where you position the cursor and click the button. The process of inserting the column may slightly change the shape of the surface.
Remember that one of the basic rules of NURB surfaces is to evenly (as best as possible) space the rows and columns. Notice that for the above example, the new column was inserted half-way between two other columns. In general, it is best if you always insert a new column (or row) half-way between two other columns (or rows). This may force you to have more rows and columns than you think you need, but the extra evenly-spaced rows and columns will help greatly when it comes to doing detailed surface shaping and fairing.
To add a row, follow these steps:
(Remember that we will refer to horizontally oriented surface lines as rows and vertically oriented surface lines as columns. This may not be the case internally, but for the sake of clarity, we will use this terminology.)
1. Select the "Add Row/Col - Add Row/Col Angle" sub-command in the "Surf" set of commands. This command will become the current command and will show its label in the lower right of the screen.
2. Position the cursor somewhere along any of the three vertical columns approximately where you want the new row to be inserted.
3. "Click" the left mouse button to insert the new row. The program will insert the row at the point where you position the cursor and click the button. The process of inserting the row may slightly change the shape of the surface.
Remember that one of the basic rules of NURB surfaces is to evenly (as best as possible) space the rows and columns. Notice that for the above example, the new row was inserted half-way between two other rows. In general, it is best if you always insert a new column (or row) half-way between two other columns (or rows). This may force you to have more rows and columns than you think you need, but the extra evenly-spaced rows and columns will help greatly when it comes to doing detailed surface shaping and fairing.
By adding rows and columns to the NURB surface, you increase the flexibility and number of shape control points, which appear at the intersections of all rows and columns. This is the only way to add additional shape to NURB surfaces. Unfortunately, there is no way to add control points to a surface without adding a full row or a full column.
This screen shows what happens when you move a column point to create a surface with very uneven spacing of columns. This is move is perfectly legal, but causes the surface to have an unwanted bump in the upper right portion of the surface. Try moving points on a simple NURB surface to see how the shape behaves for different numbers of rows and columns, and for different positions of the defining points.
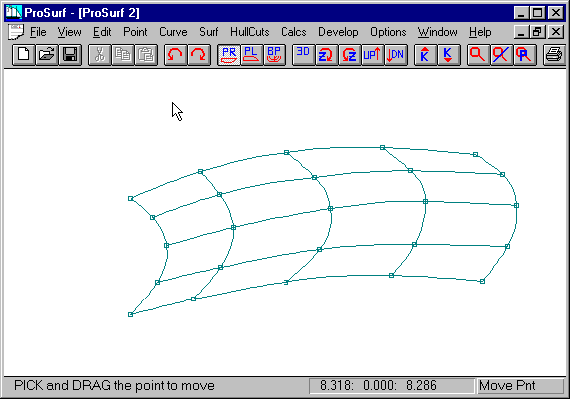
This screen shows a surface with 5 rows and 5 columns which are all fairly evenly spaced. This makes it easier to control and fair the shape of the surface. One rule-of-thumb is to always add rows or columns by inserting them half way between two existing rows or columns. This will always guarantee that the spacing between two consecutive rows or two consecutive columns is no more than a 2 to 1 ratio of spacing. Another way of saying this is that if the distance between two adjacent rows (or columns) is one foot, then the next row (or column) in sequence should not be more that 2 feet further along or less than ½ foot away. This 2 to 1 ratio is maintained if you always insert the row (or column) half way between two existing rows (or columns).
Compare this spacing to the positioning of "ducks" along a mechanical spline or batten. In flat areas of the spline you space the ducks widely, but in the tighter curvature areas you start to position the ducks much more closely using a gradual change in spacing of the ducks. Try to compare the spacing of the rows and columns to the spacing of the ducks on a batten. Although you are allowed to place the rows and columns where ever you like, you will notice some very odd surface shapes occur with uneven spacing. Try an example and see what happens.
An important guideline is to define the surface using as few rows and columns as possible. If you shape and fair the surface as you add rows or columns, you will most likely be able to achieve this goal. This is like designing by hand where you start with the profile, the waterline, and midship station and then slowly add additional stations and waterlines, fairing as you go. For NURB surfaces, do not add a bunch of rows and columns and then try to shape and fair the surface. Shape and fair as you go.
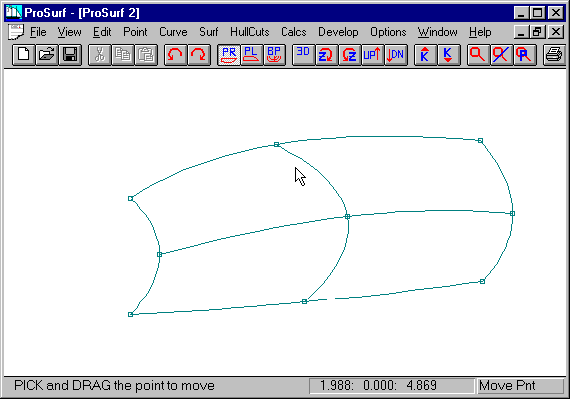
This screen shows the same surface after several rows and columns have been deleted. Just as you can insert any number of rows and columns, you can likewise delete any row or column. The only case where this is not true is if you have a two row and two column surface which is the smallest surface you can have. At this point you would have to delete the whole surface using the Delete Surf command, rather than to delete one row or one column.
To delete rows or columns, follow these steps:
1. Select the "Del Row/Col" command from the "Surf" pull-down menu. This command will then become the current command and its label will be displayed in the lower right corner of the window.
2. Position the cursor along the row or column you wish to delete. Make sure that you position the cursor away from one of the row/column intersection points because the program might delete a row instead of a column (or vice-versa).
3. "Click" the left mouse button to delete the row or column. The surface will be redrawn without that row or column and the surface might change shape slightly.
4. You can continue to delete other rows or columns as long as the "Del Row/Col" command stays current.
Remember that any change to any entity can be undone using the UNDO command in the Edit pull-down command set or by picking the counter-clockwise arrow on the tool bar.

Another important surface command is the ability to split one large surface into two smaller surfaces along a selected row or column. This command is equivalent to the "Knuckle Pnt" command for curves. When you pick a row or column to split the surface, the program converts that row or column to a "knuckle" line, thereby creating two separate surface entities from one larger surface entity. As seen in the screen above, the middle "row" from the surface in the previous screen has been converted to a knuckle line, which you might think of as a chine line. You can now add rows and columns to each surface. The row was converted as follows:
1. Select the "Cvt Row/Col Knuckle" command from the Surf pull-down set of commands. This becomes the current command and will remain in effect until you select another command.
2. Move the cursor to some position along the row or column you wish to convert. Avoid positions near defining point intersections since the program will have difficulty in determining whether you are selecting a row or a column to convert.
3. "Click" the left mouse button to select the curve. The program will immediately erase and redraw the surface as two new subsurfaces.
4. You can continue this process as long as this command remains current.
Note that this command can also be used to join two surfaces into one, larger surface. The command acts as a toggle, which means that:
1. If you pick an internal row or column of a surface, the program will split it into two subsurfaces, joined at a common knuckle line (this becomes a "bonded edge").
2. If you pick a common knuckle line (bonded edge) between two surfaces, the program will join the two surfaces as one and the knuckle line will disappear.
This command performs these two opposite operations. To see how this works, use this same command to pick an internal row to split the surface into two and then immediately pick the same row (now a surface edge) to convert the two surfaces back to the single, original surface.
This is an odd, but extremely powerful command. It allows you to create and modify chine hulls quickly and easily. For example, if you wish to add a chine step to a single chine boat, you can do so by adding a new row on the lower hull surface right below the chine. Then you use this Cvt Row/Col Knuckle command on that row to create a new, separate surface to use as the step. Next, you can merge the bow points of the inside and outside chine edges and use the Match Z Edit command to set the heights of the inside chine edge equal to the heights of the outside chine edge. Within a couple of minutes you have created step in a single chine boat.
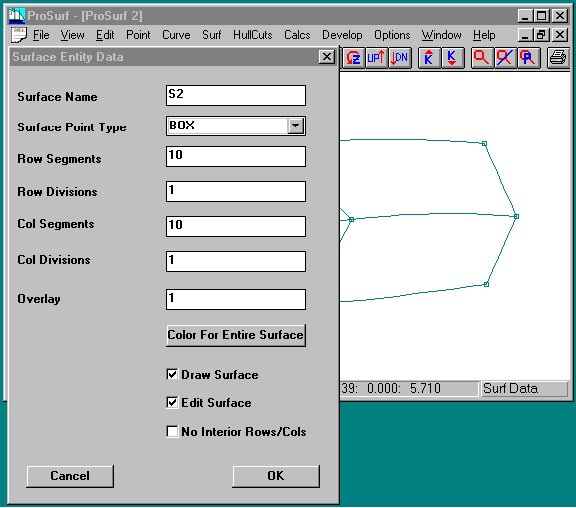
All geometric entities have properties or attributes associated with them, such as point type and entity color. This screen shows an attribute dialog box for one particular surface entity. It was displayed as follows:
1. Pull down the Surf set of commands and select the "Surface Attributes" command. Nothing will happen except that this becomes the "current" command and the label "Surf Data" is displayed in the lower right corner of the window.
2. Move the cursor near a row or column of one of the surface entities and "click" the left mouse button.
3. A dialog box, like the one shown above, will appear..
4. The attribute fields are:
Surface Name - The surface's name, created by the program. You can change it, if you wish.
Surface Point Type - The type of symbol to use to mark the curve point's position.
Row Segments - The number of straight line segments used to display each row between each set of defining columns.
Row Divisions - The number of "sub-row divisions" to display on the surface between each set of defining rows.
Col Segments - The number of straight line segments used to display each row between each set of defining rows.
Col Divisions - The number of straight line segments used to display each row between each set of defining columns.
Overlay - The overlay layer of the entity. (Currently not used by the program)
Color - Color to use for the surface.
Draw Surface - Option to turn off the display of the entity. Use the Draw All Surfaces command to turn on the display of the surface.
Edit Surface - This allows you to display the surface, but to disable the ability to edit its shape.
No Interior Rows/Cols - When checked, this means that the program will draw only the outside edges of the surface (first and last rows and columns). This is useful if you wish to turn on the hullcuts for the surface and remove the display of the interior rows and columns.