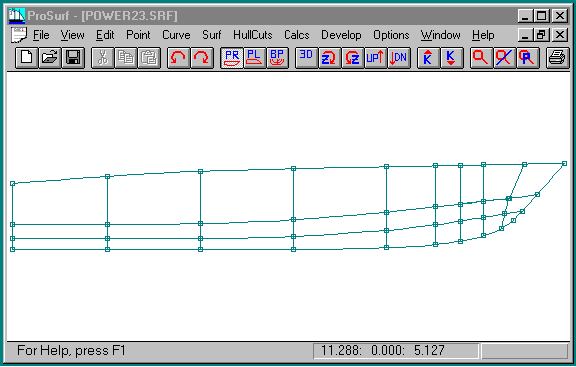
This section discusses the layout and organization of the program. Let's start by looking at a "snapshot" of the screen as you see it now.

This view shows the profile view of "power23" maximized to use the entire program framework window. The screen consists of the following areas:
1. The Program Framework Window - This is the overall window for the program, which is displayed on the screen for the entire duration of the program. It contains the outside border of the window, the title of the program, the list of pull-down menus, and the toolbar.
2. The Boat-View Window - This is the window (inside of the program framework window) which contains one view of one boat. This window can be maximized or resized using standard Windows techniques. When you start up the program, a "New" (empty) boat view window is displayed for you to create a new boat or to start entering geometric entities. For this tutorial, you have closed this initial boat-view window and have opened up one for the profile view of the "power23" hull.
3. The Pull-Down Menu List - This is the horizontal list of command "groups" for the program. It consist of the group commands: File, View, Edit, and so forth. All of the commands for the program are grouped under all of these pull-down menu choices according to function. For example, all file manipulation and printing commands are located under the "File" pull-down menu, and all of the viewing-type of commands fall under the "View" pull-down command. Although there are some standard command locations for all Windows programs, the location and grouping of most commands are determined by the program developers. Although we tried to group the commands logically, you may find yourself searching around looking for a command or wondering what a command does. If this is the case, the main help file for the program will give you an answer very quickly, since it is organized by pull-down menu command list.
4. The Toolbar - This is the horizontal line of icons located just below the pull-down menu list. These icons are shortcuts for commonly used commands located in one of the pull-down menu lists. Some of these icons are common for all Windows programs, such as the "Save" icon and the "Print" icon. Most of the icons, however, relate to functions associated with viewing and manipulating a boat.
![]()
5. The Status Line - This is the text line at the bottom of the Program Framework window which is used for command prompts, warnings, and error messages. Since some commands require multiple steps to complete, this line will contain prompts to let you know what the program expects. For example, when you select the "Surf-Add Surf" command, the program requires you to "pick" the four corners of a simple, starting surface. The program will prompt you to pick each of these corner points with a message on this status line.
6. The Current Cursor Location - This [X,Y,Z] coordinate value is located towards the right of the status line and is updated continuously when you move the cursor in the boat-view window. These values will refer to the full-size model coordinates of the boat.
[Aside: The default coordinate system for the boat is: 'X' is positive going towards the stern (station), 'Y' is positive going in the beam direction (half-breadth), and 'Z' is positive going upwards (height). 'X' is zero (usually) at the bow or the forward end of the waterline), 'Y' is zero on the centerline, and 'Z' is zero on the baseline, which is usually at or below the canoe-body of the hull.]
7. The Current Mode Command - This is located at the far right of the status line. It displays the menu command which is currently in effect. For many commands, after you select it, its label is placed in the Current Mode field and that command is current until another mode command is selected. What this means is that you do not have to reselect most commands each time you wish to perform the operation. For example, once you have picked the "Edit-Move Point" command and it has become "current", you do not need to reselect the menu choice to move the point, you just pick any point and drag its position. To change the current mode command, just select another menu command. Note that some commands do not change the current command mode. An example of this is any of the View commands. This limitation allows you to change between views without having to re-establish the current mode command.
8. Scrollbars - If you "Zoom-In" on a portion of the currently displayed boat so that only a portion of the hull is displayed, the program will display scrollbars of the side and/or bottom of the boat-view window. These scrollbars allow you to move or "pan" the view left, right, up, or down.